Saturday, November 19, 2011

DIY Pumpkin Pie Spice

I am a spice junkie/addict. I will probably need an intervention soon so get ready to prepare your speeches and tell me why I need to give up my addiction. I acknowledge it is a disease, but I simply love to have lots of spices in my cupboard. I am thinking of moving to a bigger house just so that I will have a huge pantry for my spice collection. Hmm...maybe it is hoarding and not an addiction. I would qualify to be on both reality TV shows.

I have such a fond memory of Thanksgiving and spices. When my boys were "little" (under 4) I volunteered to bring pies to a family gathering for Thanksgiving. I worked almost every holiday, and that year I had to work at 7AM. I had also worked two 12 hour days before the holiday, so I really had no time to bake the night before.  I was lucky enough to get another nurse to come in at 6PM on Thanksgiving so that I could join the family for a late dinner. I knew that I couldn't bake pies during the day, so I got up at 4:30 to bake. Well, I gathered all of the ingredients and realized the cloves container was empty. I panicked! I couldn't go to the store, bake pies,  and get ready to be at work on time. So, I woke my dear sweet husband up and asked him to go to the 24 hour supermarket. It was the first day of his vacation and that wonderful man went out in the dark to buy me a container of cloves. I still have that container and re-fill the bottle with fresh cloves every Thanksgiving. I simply cherish the bottle and will not throw it away. It is symbolic to me and such a sweet memory.


I love fresh spices, and farmers markets or Sprouts/Whole Foods are great places to purchase them. Whenever a recipe calls for the typical blend of fall spices like cinnamon, nutmeg, etc. I toss in a couple of teaspoons of this homemade pumpkin pie spice. It’s better than any premade version that I have found and since you probably have all the spices on hand, it is less expensive than the pumpkin pie spice you buy in the store.

I measure all of the ingredients into a small weck jar, seal it up and give it a good shake to ensure it’s well blended. Then you can smack a label on it and you’re good to go. Or if you’re obsessed with adhesive vinyl (that's me), you can go that route and cut out a nice font for your homemade pumpkin pie spice. Just store it in your pantry as you would any other spice and you’ll have all the flavors of fall at your fingertips.

Ingredients:

3 tablespoons ground cinnamon
2 teaspoons ground ginger
2 teaspoons nutmeg
1 ½ teaspoons ground allspice
1 ½ teaspoons ground cloves

Directions:

1. Combine spices in a small bow, mix well to combine. Store in a small jar or spice container.

Friday, November 11, 2011

Cheater Apple Crumble Pie

I have been super busy these past weeks and I  love having a hot apple pie for fall ready to bring to events or a nice treat. This is such an easy, home baked apple pie...with help from Mrs. Pillsbury. I do like the taste of a pie crust that is not a "cheater". But busy women need help every now and then! I keep a frozen crust in my freezer, and I always have apples on hand for baking, whipping up this pie is a cinch. 


Crust:
Cheat and use ready-made Pillsbury pie crust shell, deep dish. Place it on a cookie sheet in the foil liner – it will make it easier to take out of the oven. If you want it more "home made", put the foil pie tin in one of your pie pans...it almost passes for you own.
Filling:
6 large apples peeled, cored and sliced to about ¼ inch thick. (I use a mix of granny smith and honey crisp)
¼ cup packed brown sugar
2 tbsp flour
1 tsp cinnamon
Toss all the ingredients together in a bowl – making sure the apples are well covered. Pour into pie crust shell.
It might appear to be really full or high, but it will bake down.
Crumble topping:
½ cup flour
1 cup quick oats
¾ cup packed brown sugar
1 tsp cinnamon
6 tbsp melted butter
A pinch of salt
Mix all the ingredients together and press over the apple filling
Bake at 375 for about an hour. If the crust looks like it might be browning quicker than the crisp topping you can cover the edges in foil.
Cool completely and top with vanilla ice cream!

Monday, November 7, 2011

Joanne's Chocolate Pecan Pie Bars

I often have wished Betty Crocker was my grandmother, it would be such fun to have her baking in my kitchen with her cute bouffant hair. My grandparents lived very far from us growing up, so I do not have many baking memories with them. I am convinced my mom is somehow related to the Crocker family, she is simply the best baker I know. 

I have not posted in a few weeks, my mom is very ill and I have been caring for her. When I was young, I would watch her make a pie or a batch of cinnamon rolls without looking at a recipe. She would "look" at the ingredients in a bowl and add till it looked "just right". I would always get to stir, add, and pour the batter into the pan. These are my fondest memories of my childhood: baking. This recipe is in my mom's honor, a family favorite.  It has chocolate added, what could be better?  These bars are rich and delicious, and keep well for 2-3 days so they're perfect for a busy holiday season. 

 
Joanne's Chocolate Pecan Pie Bars

Crust
1 3/4 cups flour
1/4 cup packed brown sugar (light or dark)
3/4 teaspoon salt
3/4 cup cold butter, cut into pieces
1-2 Tablespoons cold water

Filling
3 eggs
3/4 cup packed dark brown sugar
1/2 cup light corn syrup
2 teaspoons vanilla
2 Tablespoons butter, melted
1/2 teaspoon salt
2 cups pecan halves, coarsely chopped
3/4 cup semisweet chocolate chips

Directions

1.  Heat oven to 375*F
2.  Line the bottom and sides of a 9"x13" baking pan with aluminum foil.
3.  (For the crust)  In the bowl of an electric mixer, beat 3/4 cup butter, brown sugar and salt until smooth and creamy.  Add flour, and beat until coarse crumbs form.  While the mixer is running, add 1-2 tablespoons of cold water, as needed to help form dough.  
4.  Press dough into the bottom and 1/2 inch up the sides of the prepared pan.  Prick the dough with a fork several times, randomly around the pan.  Bake 10-12 minutes or until light golden brown.
5.  (For the filling)  In a large bowl, mix eggs, brown sugar, corn syrup, vanilla, melted butter, bourbon and salt with a whisk until well blended.  Stir in pecans and chocolate chips.  Pour filling into baked crust.  
6.  Bake 20-30 minutes or until golden brown and filling is set.  
7.  Cool 1 hour, then set in the refrigerator to further cool.  Cut into squares using a serrated knife, with a slight sawing motion, and clean the knife between cuts as needed, if you want nicely cut bars.  Store covered, in the refrigerator.  Serve cool, or at room temperature.  Can be stored up to 3 days.     


Thursday, October 27, 2011

Shopping for my Halloween Baking

Here are some of my favorite things for my Halloween baking. There are lots of colorful sprinkles, candy melts, and cupcake toppers for this very fun holiday. I purchased them at Target, Wal-Mart and Michaels. The lime green  candy melts are very unique and with orange, a great mix of color.

Simply amazing!

I love these cupcake wrappers, they are easy to use and make the cupcakes have a personality. They have wrappers for almost every holiday and occasion available at the stores. These were just too cute to pass up. Stay tuned for pictures from my baking weekend, I am very excited!

Pumpkin Nut Fudge

This recipe is the basic chocolate fudge from the back of the Kraft marshmallow creme jar, but with the addition of a few extra ingredients. Be prepared for sweetness, but the pumpkin taste is oh so good!


Ingredients
  • 3 cups sugar 
  • 3/4 cup melted butter
  • 2/3 cup evaporated milk
  • 1/2 cup canned pumpkin (you can add up to a cup of pumpkin if you want it to have a stronger pumpkin taste)
  • 2 tablespoons corn syrup
  • 1 teaspoon pumpkin pie spice  (I double this, I like it spicey)
  • 1 (12-ounce) package white chocolate morsels
  • 1 (7-ounce) jar marshmallow crème (who doesn't like this? So incredibly yummy)
  • 1 cup chopped pecans (you don't have to add them, it's your choice)
  • 1 teaspoon vanilla extract

Preparation

  • Stir together first 6 ingredients in a 3 1/2-quart saucepan over medium-high heat, and cook, stirring constantly, until mixture comes to a boil. Cook, stirring constantly, until a candy thermometer registers 234° (soft-ball stage). Make sure to use a candy thermometer, it has to be soft ball or you will have a grainy, sticky mess. The thermometer's are under $10 at Wal Mart/Target, and well worth the investment for the serious candy maker.
  • Remove pan from heat; stir in remaining ingredients until well blended. Pour into a greased aluminum foil-lined 9-inch square pan. Let stand 2 hours or until completely cool; cut fudge into squares.

    Notes: Line pan with aluminum foil before you begin to cook the fudge. Once the candy thermometer reaches 234° and the remaining ingredients are added, quickly spoon the fudge into the pan. If you don't work quickly, the pan will continue to cook the fudge and you will have burnt fudge :(

Friday, October 21, 2011

Apple Pie Bars


apple pie bars


Ingredients:

This recipe is delicious and so easy to make on a cool fall day. It is like having an apple pie to hold!
CRUST:
1 1/2 cups unsalted butter, at room temperature
3/4 cup granulated white sugar
3 cups all-purpose flour
1/2 teaspoon cinnamon
1/4 teaspoon nutmeg
1/2 teaspoon kosher salt
FILLING:
6 Tablespoons unsalted butter, thinly sliced
1/2 cup light brown sugar
6 pounds (about 12) Granny Smith apples , peeled, cored & thinly sliced
1 Tablespoon cinnamon
1/4 teaspoon nutmeg, freshly grated (preferred)
1/2 cup water, as necessary
TOPPING:
3 cups quick cooking oats
2 cups all-purpose flour
1 1/2 cups light brown sugar
1 1/4 teaspoons cinnamon
1/2 teaspoon baking soda
1/2 teaspoon kosher salt
1 1/2 cups unsalted butter, cut into 1/2-inch cubes and chilled

Directions:

1. Prepare the crust: Preheat the oven to 375°. Line a 12-by-17-inch rimmed baking sheet or jelly roll pan with parchment paper. With an electric mixer, beat the butter with the sugar at medium speed until light and fluffy, about 2 minutes. At low speed, beat in the flour, spices and salt until a soft dough forms. Press the dough over the bottom of the prepared pan and 1/2 inch up the side in an even layer. Bake in the center of the oven for about 15 minutes, or until the crust is golden and set. Let cool on a rack.
2. Meanwhile, prepare the filling: In a very large, deep skillet melt the butter with the brown sugar. (If you don't have a large skillet, divide between 2 skillets). Add the apples to the skillet and cook over high heat, stirring occasionally, until softened, about 10 minutes. Stir in cinnamon and nutmeg. Cook until the apples are caramelized and very tender and the liquid is evaporated, about 10 minutes longer; scrape up any bits stuck to the bottom of the skillet and add up to 1/2 cup of water to the pan to prevent scorching. Let cool.
3. Prepare the topping: In a large bowl, mix the oats with the flour, light brown sugar, cinnamon, baking soda and salt. Using fingers (wash your hands and take off your rings first!), squeeze the butter into the oats & sugar and crumble together until the mixture resembles coarse meal. Press the mixture into clumps.
4. Assemble the bars: Spread the apple filling over the crust. Scatter the crumbs on top, pressing them lightly into an even layer. Bake in the center of the oven for 50 to 60 minutes, or until the topping is golden; rotate the pan halfway through baking, and keep an eye on it to make sure the top isn't getting too browned. Let cool completely on a rack before cutting into 2-inch bars.

Tips:

*For this recipe, the 12x17-inch rimmed baking sheet (half sheet pan) is easiest to use. It fits perfectly in this pan. If you don't have this pan, you can try and wing it using a couple of smaller ones.
*This recipe makes a large quantity. Make sure you have lots of people to feed :)
*The bars can be stored in an airtight container at room temperature for 4 days or frozen for up to a month.

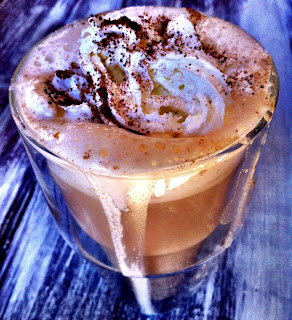
Yummy Pumpkin Spice Latte: Homemade!


Do It Yourself version of Starbuck's delicious Pumpkin Spice Latte...YUM!


pumpkin spice latte

Yield: 1 drink
Prep Time: 10 min
Cook Time: 4 min

Ingredients:

1/2 cup whole milk
1 tablespoon unsweetened canned pumpkin puree
1 teaspoon packed light brown sugar
1/4 teaspoon pumpkin pie spice
1 teaspoon vanilla extract
1 cup hot brewed, coffee- I always use my Keurig- donut shop plain coffee works best
2 tablespoons half & half cream or for the dieters-skim milk
1 teaspoon granulated white sugar, or more to taste-splenda works great tto
whipped cream, optional-never optional for me
ground nutmeg


Directions:

1. In a glass measuring cup or microwave-safe bowl, whisk together milk, pumpkin, brown sugar, spice and vanilla. Microwave for 1 to 2 minutes- watch closely and remove it from the microwave when the milk is hot and frothy.


2. Pour the pumpkin milk into a tall mug or glass. Add hot coffee. Pour in the cream. Add a teaspoon of sugar. Stir, and taste. Add more sugar, if desired.


3. Optional, but oh so good (let's be honest, it is not optional) add whipped cream on top and a sprinkle of nutmeg. Serve immediately!

Tips:

*Feel free to lighten up the recipe by using nonfat milk and fat-free half & half. It won't be as rich, but it will still give you that yummy pumpkin latte flavor.
*If you don't have pumpkin pie spice in your collection of spices, make your own! Mix equal parts of cinnamon, ginger, allspice and nutmeg- and measure from there.

Source: RecipeGirl.com

Thursday, October 13, 2011

Candy Corn Butterfinger Pops

I simply love fall, it is my favorite time of year. I think of cooler weather, decorating, Halloween, and of course my favorite candy: candy corn ….lots and lots of candy corn! The darling yellow, orange, and white color combination is irresistible. Now, I must admit, eating more than two pieces of the stuff makes me sick to my stomach… but I eat it anyway. I collect candy corn decorations and I try to make them a theme for tailgates/parties/gifts.  I wanted to find a candy corn flavored dessert recipe that wasn't quite as sweet as just pure corn syrup and sugar. I found a lot of recipes, but this is very good and contains the real stuff.

This recipe is great because it can be completed in the microwave. It does require a little time for all that dipping, but you can stick it in the freezer in between dips. Now you can just eat the candy corn out of the bag for a purest, but this is sure good and so much more decorative! 
Approximately 32 Pops
  • 1 lb Candy Corn
  • 1 16 oz can creamy peanut butter
  • 1 lb yellow candy melts
  • 1/2 lb orange candy melts
  • 1/4 lb white candy melts
  • 32 Lollipop sticks
  • Foam block for drying
  1. Place candy corn in a microwave safe bowl.
  2. Microwave on high for 1 minute. Stir and continue cooking in 30 second intervals until melted. Stir between each interval.
  3. Stir in peanut butter until smooth. (The mixture will be thick and sticky and may look kinda gross but trust me, it’ll all come together!)

4. Spread mixture in a 8 x 8 pan lined with parchment or wax paper.
 *Tip: Use a square of parchment or wax paper to pat down and smooth out the mixture.
5. Refrigerate or place in freezer to allow it to cool completely.


6. Cut into 2 inch strips and cut each strip into triangles, with a one inch base.


7. Melt yellow candy melts according to package directions and place in a deep cup.
8. Dip lollipop stick into melted candy and insert into the bottom of each triangle and allow to dry completely. *Tip: Place dipped triangles on a cookie sheet and place in freezer for a few minutes to allow the candy to dry quickly.
9. Dip entire triangle into the melted yellow candy. Place your pop into a foam block to dry. For quick drying, place pops in the freezer for a few minutes
10. Melt orange candy and dip pops 2/3 of the way into the melted mixture. Place back in foam block to dry completely.


11. Melt the white candy and dip the tips into the melted mixture. Place back in the foam block to dry (I know, it’s a lot of dipping!).
After lots of dipping and drying, your pops are finally done!! They are a bit of work but so cute for Halloween. Look for Halloween ribbon at your local craft store and tie at the bottom of the candy stick.

Tuesday, October 4, 2011

Congo Bar Time!


It's fall and I just love to bake when the air is cooler. This is a family favorite and so easy to make. The house smells amazing for several hours after you take these out of the oven.

Ingredients:
2/3 cup butter
2 1/4 cups brown sugar
2 1/2 cups all- purpose flour
2 1/2 teaspoons baking powder
1/2 teaspoon salt
3 eggs
12 ounces (two cups- the bags of chocolate chips contain only 10 or 11 ounces now. I just can't bear the thought that one ounce of chips would not be included, so add two heaping cups of chocolate chips. You only live once)
1 cup of nuts (walnuts, pecans are lovely)

Directions
Preheat the oven to 350 degrees
Melt the butter in a microwave safe bowl (it usually takes 30 seconds to melt 2/3 cup)
Whisk in the brown sugar and set aside to cool


Mix the dry ingredients and set aside. Remember not to let the baking powder and the salt touch prior to mixing. It will not cause the desired chemical reaction, it will work but it's always better to mix separately.


Beat the eggs into the brown sugar and butter mixture, one at a time. Add the flour to the wet ingredients, then the chips and nuts.


Spread into a prepared 9x13 pan (I always use PAM for baking)


Bake for 25-30 minutes, until the dough is lightly browned and a fork inserted into the center comes out clean. I love my ladybug timer, it reminds me of Allison and her sorority days :)


 Let cool completely before cutting into squares.


Thursday, September 29, 2011

Brownie Bites: A family favorite!


This super easy treat is a favorite of all. They are so easy to make, and a great dessert to serve when all you want to provide is a napkin. I can make a batch in less than an hour (if you want them cute it will take the full hour), but so worth it!

Ingredients:
Betty Crocker Brownie Mix (simply the best - do not use the mix with added chocolate chips). Make the mix according to directions, do not use egg substitute.

Sprinkles (everything is better with sprinkles) or your favorite topping. I have used Heath Bar brickle, coconut (use the extra fine baking coconut for even distribution), cookie crumbs, mini M&M's and graham cracker crumbs with finely chopped marshmallows for smore bites. Be creative, even if they aren't pretty, eat the mistakes. Those are the most fun!

Melted Chocolate/Almond Bark/Candy Melts (Wilton) for dipping. If you are serving these to chocolate addicts, you may want the "real good stuff" and melt high quality chocolate. I use both, but the "flavored" chocolate which is in the bark and melts, is very easy to work with and is very smooth to melt.

Wilton Brownie Pop silicone mold (a must, I have two)


Spray "Pam"  inside the cavity of the mold-make sure all sides are coated well.

Pour the prepared brownie batter into the mold and tap the mold gently to ensure even distribution.

Bake for 20-25 minutes at 350 degrees. The time will vary depending upon how full you fill the mold. I fill 2/3 full so that the base of the brownie is flat and sits flush on the serving plate. Always place the mold on a cookie sheet for stability.

Once the brownies are finished, cool in the mold. If you are in a hurry, you can put them in the freezer. This mold is very durable, and can go from the oven to the freezer without any problems. I am not patient and I tend to use my freezer often to quicken the process.

 Turn on the brownie bites onto a clean surface, and make sure they are cool before you attempt to dip them. If you do not cool them completly, they will not dip well.
Melt the chips in a microwave safe bowl. Be careful not to overheat, the chips will be one huge ball of glue if you do not watch the chocolate carefully.
Dip the bites into the mixture, coating a little or a lot. I like to coat 1/2 of the bite.
Shake your favorite topping over the bite to coat. Mix it up and use different sprinkles or toppings for variety. Serve on a pretty cake plate, or seal in a cello bag for a special treat once they are cool.


Note: You can insert sticks into the top of the bites if you desire to make them "pops". Dip the end of a lollipop stick into the melted chocolate, then insert into the brownie. Make sure it is secure, I often freeze them at this point to ensure they are secure and will stay.
For the pops, you will dip the bottom and then coat. They are very cute and a favorite with the kids!

Yummy Zucchini Bread

We were fortunate to have our wonderful friends shower us with homegrown zucchini (and a lots of tomatoes) this summer. They have a wonderful garden that produced a lot of veggies, and we graciously accepted the pesticide free crop. We had zucchini in every form, but my favorite is zucchini bread fresh from the oven. Here is one of the best recipes I have tried:

Ingredients

  • 3 cups all-purpose flour
  • 1 teaspoon baking powder
  • 1 teaspoon ground cinnamon
  • 1/2 teaspoon salt
  • 1/4 teaspoon baking soda
  • 1/2 cup egg substitute
  • 1/3 cup canola oil
  • 1 teaspoon grated lemon rind
  • 2 teaspoons vanilla extract
  • 1 large egg, lightly beaten
  • 1 1/2 cups sugar
  • 3 cups shredded zucchini (12 ounces)
  • 1/4 cup coarsely chopped walnuts, toasted
  • "Pam" cooking spray

Preparation

  • Preheat oven to 350°.
  • Lightly spoon flour into dry measuring cups; level with a knife. Combine flour and next 4 ingredients (through baking soda) in a large bowl.
  • Combine egg substitute and next 4 ingredients (through egg) in a large bowl; add sugar, stirring until combined. Add zucchini; stir until well combined. Add flour mixture; stir just until combined. Stir in walnuts.
  • Divide batter evenly between 2 (8 x 4-inch) loaf pans coated with cooking spray. Bake at 350° for 1 hour or until a wooden pick inserted in center comes out clean. Cool 10 minutes in pans on a wire rack; remove from pans. Cool completely on wire rack.

Monday, September 12, 2011

I'm on TV!

I was filmed for national news today. It is such an honor to be featured and to include pictures of me baking some of my favorite things. I baked cupcakes and brownie pops, it was quite fun. They took lots of pictures of me baking, then of me blogging my entry.


I met with the nicest people from NBC news, and they are "featuring" me and my baking as part of the interview. They asked me what I loved to do during the initial interview and I said bake. The interview was to discuss my surgery that I had two years ago, but it ended up as a baking adventure. The producers/camera man were very easy to work with and made the adventure fun. The camera man is also the NBC lead camera operator at Stanford football games, I will look for him each week.


 I was chosen because I had such success post surgery and the FDA is in the process of approving the procedure after two years of clinical trials. What a hoot, they made me feel like a star! I was originally going on the Dr. Oz show as a clip of successful surgical patients, but the producers decided to make it a national news show to be shown all over the country, and featured on all links. There is two hours of me baking and being interviewed about the surgery. I am sure there will only be a few minutes (if that) of me in the end, but it is a memory. I will post the link when they send it to me.

Tuesday, September 6, 2011

Chocolate Chip Cookies: America's Fuel

Chocolate Chip CookiesThis is my very favorite type of cookie and my favorite cookie recipe of all time. I have made countless batches, but my most memorable ones are the ones I made on the first day of the new school year. I had a cookie tradition that I hope my children and their friends will remember.  Every year on the first day of school the kids were greeted with cookies as they stepped in the door. We sat down to share our "cookie chat" about the first day during the first few hours of the big day. I have so many fond memories of home made "first day" cookies. I regret not taking pictures of them sitting around the table with big glasses of milk and a plate of warm cookies.
The tradition started when Matt entered kindergarten. I had made these cookies and when he came home he called them his "first day of school cookies".  On that  day in September of 1986, I decided that I would bake cookies on the first day of every school year to mark this huge yearly event.   Even if it was 100+ degrees outside, I made the cookies to welcome home my children and a new school year. It was very bittersweet the year I baked cookies when Allison was a senior. I remember thinking that I wouldn't have anyone to bake for the following year, and I ended a 19 year tradition of first day cookies.
Whenever I make this recipe I think of the wonderful times shared around the table on the first day, and how lucky I am to share them with three great children.

All-time Best Cookies (or First Day Cookies)

Serves: A lot
It makes A LOT of cookies, but every bite is worth the enormous amount of calories that come along with the sugar and vanilla. You may have to run a few extra miles during your workout, but enjoy every step after eating these yumm-o's.


One pound of butter (yup, use the real stuff)
One box of light or dark brown sugar, your preference. I usually use light
1.5 cups of white sugar
2 tablespoons of vanilla
3 Eggs
Cream all the above ingredients together.


Add slowly:
5.5 cups of flour

1.5 teaspoons for soda
1.5 teaspoons of salt
Batter will be thick and simply lovely for taste testing.

Then add:
2 bags or 4 cups of semi-sweet chips (the new bags are smaller now, 11 ounces instead of 12, so I would add the full amount so that you have plenty of the rich chocolate goodness in each bite)
Optional: 2.5 cups of chopped nuts

Very important: Use a Silpat! These are wonderful baking sheets that allow ease in removing your cookies. One of the best investments you will ever make. There is no need to grease the sheet, the Silpat is a wonder. There are many brands of baking sheets, I have tried them all. For the most part they are all excellent.


Drop cookies using an ice cream scoop, you will get uniform shaped cookies.

Bake at 275 degrees for 18-20 minutes (the secret, this is why they are so soft and good-slow baking)


Cool slightly before removing from Silpat. They are really best warm with a large glass of cold milk. Bakeries believe that cookies should be eaten within 4-6 hours of taking them out of the oven. That is a big task with this large amount of dough, but they are still good the next day.